
DOCUMENTATION |
http://www.exit1.org/dvdrip/doc/gui-gui_clip_zoom.cipp Printed: Sun May 17 05:08:02 2026 CET [ show page without screenshots ] |
2.5. Clip & Zoom page | [ Content ] [ Top ] |
- 2.5.1 Preview frame grabbing
- 2.5.2 Viewing preview images
- 2.5.3 Show video from here
- 2.5.4 Using presets
- 2.5.5 Manual editing
- 2.5.6 Generate preview images
- 2.5.7 Calc height / width
- 2.5.8 Move 2nd clipping to 1st
- 2.5.9 Open zoom calculator
After selecting (and probably ripping) a DVD title it's time to adjust the clipping and zooming parameters. transcode supports three processing stages for this task, in this order:
Often you don't need to use all three steps, particulary the last clipping step may be omitted. Anyway it's very easy to define the correct parameters with this model.
- Clip the video
- Zoom or shrink the clipped video
- Clip again the result of the zoom/shrink process
2.5.1 Preview frame grabbing |
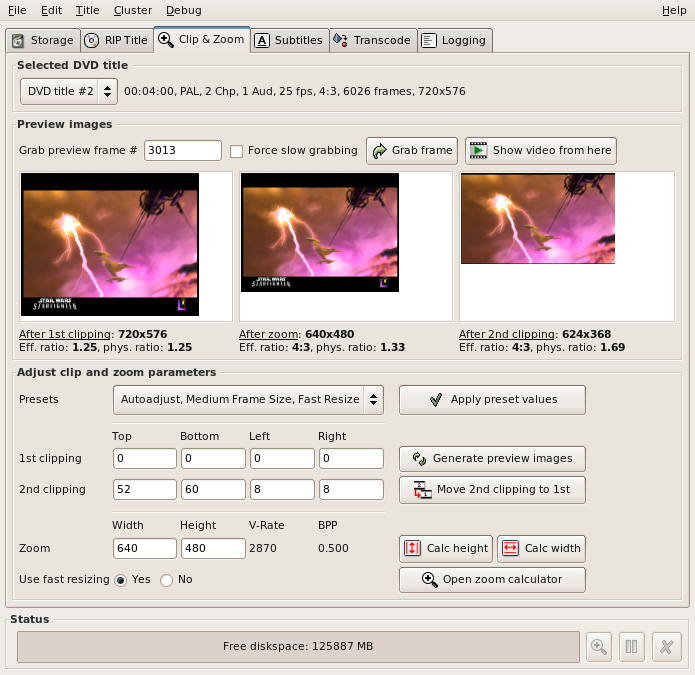
The grabbed image will appear in the preview section three times. The first shows the image after the first clipping, the second after resizing and the third after the second clipping.
Note: preview frame grabbing is rather slow for on-the-fly and DVD image projects, because all prior frames must be decoded. Fast movie navigation is available for ripped movies only.
2.5.2 Viewing preview images |
You can click on any preview image to view it in its original size in a separate window. Additionally, the clipping images will show up with markers for defining the clipping area.
2.5.3 Show video from here |
In ripping mode you can use the button Show video from here to start the movie player you configured for STDIN playing starting at the frame number you entered.
Note: this function is available only for ripped movies. It's disabled for on-the-fly and DVD image projects.
2.5.4 Using presets |
It's strongly suggested to use the offered Clip & Zoom presets. By default dvd::rip applies the Autoadjust, Medium Frame Size, Fast Resize preset, which gives very good results by adequate transcoding speed.
The presets are divided into two classes:
- Autoadjusting
- Fixed values
The fixed presets are currently for (S)VCD and CVD modes only. They're available two times, once for NTSC and once for PAL. You must select the correct entry for your format.
For VCD you don't have a lot of choices: 4:3 or 16:9, depending on the aspect ratio of your movie. SVCD is anamporph encoded. For 16:9 movies you can create a 4:3 format. This will cut off some of the letterbox black bars and keep more space for the real movie. CVD has a fixed frame size, anamorph encoded.
After applying a preset the preview images are regenerated automatically.
Note: for SVCD and CVD the aspect ratio information printed under the preview images is mostly useless, because SVCD/CVD is always anamorph encoded. The player stretches the image to 4:3 resp. 16:9, depending on what you've chosen. So forget about the values printed there, they don't take the rescaling of the player into account. This may be fixed in future releases.
2.5.5 Manual editing |
dvd::rip let you do the hard job, if that's what you want ;), so you can enter all values which affect clipping and resizing manually.
Note:
You must press the Generate preview images button after
changing values by hand, otherwise the displayed thumbnails
won't show up with your settings.
2.5.5.1 1st/2nd clipping |
You can enter arbitrary values in the correspondent entries or click on the preview image to get a full sized version with markers, which define the clipping area. This way you can adjust a custom clipping easily by drag'n'drop.
You can specify negative values, if you want to add corresponding black bars. This may be needed for (S)VCD formats or if you like to render subtitles on black bars for a 4:3 movie, which originally has no black bars.
2.5.5.2 Zoom |
Enter arbitrary values into the width and height entries. Currently no drag'n'drop is available for this. You may leave both fields empty, which means not to resize anything.
2.5.5.3 Fast resizing |
Fast resizing is a special algorithm for resizing the frame which is much faster than high quality resizing. The quality isn't that good, but in my opinion the difference isn't visible, at least with DVD source material.
When you enable fast resizing, there are two rules which must be complied with:
- Zoom width and height must be divisible by 8
- Both axes must shrink or expand simultaneously. You can't expand the width while shrinking the height and vice versa.
- Resulting frame sizes must be divisible by 16
- Don't clip on odd values
If you turned fast resizing on, a message will be printed besides the Zoom entries, if one of this rules is violated. If you transcode anyway, you'll get an error message.
Note:
All presets follow these rules.
2.5.6 Generate preview images |
If you change any value by hand you must hit the Generate preview images button, otherwise the displayed thumbnails won't show up with your settings.
2.5.7 Calc height / width |
If you want to have a specific width or height for your movie while keeping the correct aspect ratio, you can use these buttons. E.g. you want to define the height, then enter your value to the Height entry and press Calc width afterwards. The same applies vice versa, if you want to define the width and like to have the proper height calculated.
2.5.8 Move 2nd clipping to 1st |
This is a special function of the early days, where no auto-adjusting presets were present... ;) If you don't use fast resizing and don't have any clip1 values you can transfer your clip2 settings into clip1 settings. The aspect ratio will remain the same, dvd::rip automatically calculates the correct clip1 and zoom parameters for you (clipping before zooming has the advantage, that the zoom stage works with less pixels, which is somewhat faster).
2.5.9 Open zoom calculator |
This buttons opens the Zoom calculator window, which is described in it's own section.