
DOCUMENTATION |
http://www.exit1.org/dvdrip/doc/gui-gui_subtitle.cipp Printed: Fri May 2 06:42:27 2025 CET [ show page without screenshots ] |
2.7. Subtitles | [ Content ] [ Top ] |
- 2.7.1 Select a subtitle
- 2.7.2 Grab preview images
- 2.7.3 Render a subtitle on the movie
- 2.7.3.1 Vertical offset
- 2.7.3.2 Time shift
- 2.7.3.3 Postprocessing
- 2.7.3.4 Antialiasing
- 2.7.3.5 Color manipulation
- 2.7.3.6 Value suggestion
- 2.7.3.7 Testing your rendering settings
- 2.7.4 Create a vobsub from a subtitle
- 2.7.5 vobsub compression with rar
2.7.1 Select a subtitle |
dvd::rip supports two subtitle modes: rendering and vobsub generation. You can render one subtitle and create as many vobsubs as you want. All activated subtitles will be listed besides the selection popup, with a remark if it's rendered or vobsub'ed.
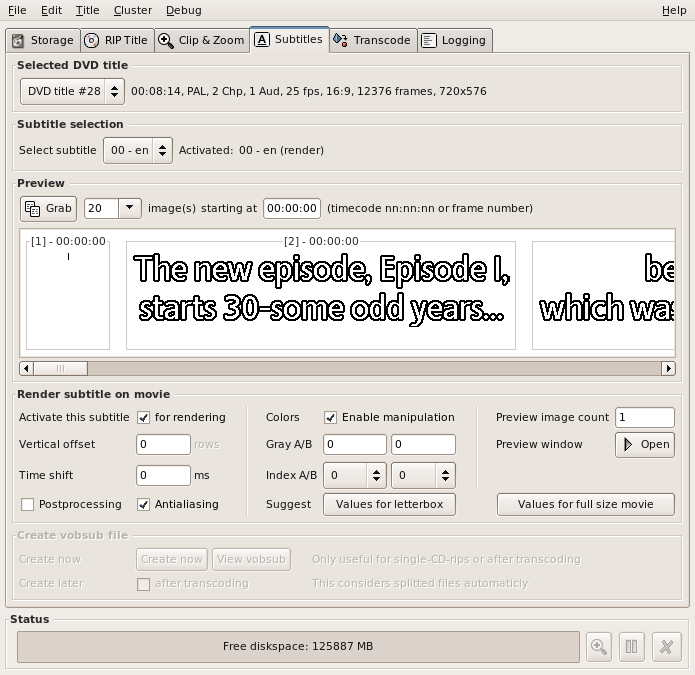
2.7.2 Grab preview images |
Next step is to grab some subtitle preview images. You can adjust the number of preview images by selecting an entry from the combo box or just enter arbitrary numbers by hand.
By default dvd::rip will fetch the images from the beginning of the movie, but you can enter a frame number or a time code (in nn:nn:nn notation) to the starting at text entry, if you want to see subtitles from later on in the movie.
Now press the Grab button; the grabbed images will appear with their timecode in the area beyond. A horizontal scrollbar appears, if they don't fit on the screen.
If this is the subtitle you want, you must decide whether you want to have this subtitle rendered straight on the movie, or as a separate vobsub file (note that only mplayer is capable of playing vobsub files). You can't have both (makes really no sense).
2.7.3 Render a subtitle on the movie |
Note:
Due to transcode restrictions subtitle rendering actually
only works for ripped movies. On-the-fly and DVD image processing
isn't supported.
If you decided to render the subtitle, click on the checkbox Activate this subtitle for rendering. The vobsub frame will be set insensitive immediately, and the rendering entries will be enabled. Note that you can activate only one subtitle per DVD title for rendering (or do you want to overlay two? ;)
Now you can adjust several rendering parameters:
2.7.3.1 Vertical offset |
By default subtitles will be rendered on the bottom of the movie. If you don't clip anything in the clip1 step, 0 is probably a good value here. But if you clip the movie, you must push the subtitle up (increase the vertical shift value), otherwise your subtitle will be cut off. The value suggestion functions help you to get a proper vertical offset value.
2.7.3.2 Time shift |
Sometimes the subtitles are not in sync, so you can enter a Time shift in milliseconds to correct this.
2.7.3.3 Postprocessing |
If you enable Postprocessing, the subtitles will be rendered after clipping and scaling. Usually the subtitles are rendered on the original unclipped, unresized image. If you want to render subtitles on black bars added using negative clip values, you need to switch on postprocessing. But beware, that you probably get bad looking results, if you scale your movie much, because the subtitles will look too big (they'll have their original size, while the movie is smaller). Leaving this disabled is Ok for most situations.
If you like to have additional black bars (e.g. if the movie is 4:3 without any black bars) you can do that by entering negative vertical values in the Clip & Zoom 1st or 2nd clipping - Top/Bottom entries. Now you need to enable the Postprocessing to put the subtitles on the black bars, generated by the reversed clipping.
Note: if you enable postprocessing, you will see the result only in a transcoded movie, not within the Filter & Preview window, nor in the transcode preview window.
2.7.3.4 Antialiasing |
You can switch Antialising on to smooth the subtitles. In general this looks better, but small subtitles may be less readable. It's also a matter of taste, so just play around with it.
2.7.3.5 Color manipulation |
Usually the colors chosen by transcode are good, but sometimes the subtitles aren't well readable (in particular if you render them on the movie, and not on black bars). Click on the Enable manipulation checkbox and the entries below will be activated.
You now can define two gray levels (values from 0 to 255) and assign them to a color index entry (from 0 to 3). Just experiment with that, so see how this affects the rendering (and the testing function is your friend ;).
It's not easy to find good color values, but the corresponding transcode documentation page helps.
Bye Peter2.7.3.6 Value suggestion |
The two value suggestion buttions Values for letterbox and Values for full size movie modify the subtitle's Vertical offset and the movie's Clip & Zoom settings. Currently this mechanism is quite simple, and incomplete but better than nothing ;)
| Button | Description |
| Values for letterbox |
At first Top and Bottom of the 2nd Clipping will be set to 0 or a small negative value (to get a letterbox - your movie must already have black bars, otherwise this won't work properly). The Vertical offset is set to 0, so the subtitle will be rendered at the bottom of the movie, right on the black bar. |
| Values for full size movie |
This suggestion will result in subtitles rendered on the movie, not on black bars. First make sure, that the black bars of your movie are clipped by applying the corresponding Clip & Zoom preset or adjusting the 2nd clipping values by hand. dvd::rip won't touch your Clip & Zoom settings but will calculate a proper Vertical offset, to move the subtitle up the right amount, so it's not cut off. |
2.7.3.7 Testing your rendering settings |
Because finding the correct settings for rendering subtitles is not always easy you can open a preview window. Just enter the number of images you want to include in the preview and hit the Preview Window Open button. The window starts with a leadtime of 15 seconds before the first subtitle image. You can close the window by pressing the [ESC] key. The video is played without sound and with maximum frame rate, not at original speed.
2.7.4 Create a vobsub from a subtitle |
If the actual subtitle isn't selected for rendering, you can create a vobsub from it.
Generating a vobsub file is a really easy task. If you do a single disc rip, you can create a vobsub immediately by pressing the Create now button. The subtitle stream will be extracted and subtitle2vobsub executed to create the vobsub file. You can press View vobsub afterwards, and mplayer will be started with the corresponding options to play your vobsub file in conjunction with the ripped VOB's.
But this really only makes sense for a single cd rip, because it results in a single vobsub file. Splitting it afterwards isn't possible.
So if you're doing a multi-cd-rip, just activate the Create later after transcoding checkbox. The subtitle extraction and vobsub generation will be done automatically after the transcoding has been finished. Splitted target files will be considered correctly.
You can select as many subtitles you want for vobsub generation. They will be created in a row after transcoding.
2.7.5 vobsub compression with rar |
mplayer supports rar compressed vobsub files - that means the three files, which belong to a vobsub
  foo.idx
  foo.ifo
  foo.sub
are compressed and archived into one .rar file. Unfortunately mplayer supports only 2.x rar files, but most Linux distributions ship 3.x. Refer to the installation chapter if you don't have a 2.x rar on your system.