DOCUMENTATION |
http://www.exit1.org/dvdrip/doc/gui-gui_zoom_calc.cipp Printed: Fri May 2 06:38:21 2025 CET [ show page without screenshots ] |
2.6. Zoom calculator | [ Content ] [ Top ] |
- 2.6.1 Resize parameters
- 2.6.1.1 Fast Resize Alignment
- 2.6.1.2 Result Frame Alignment
- 2.6.1.3 Achieve Result Alignment
- 2.6.1.4 Auto Clipping
- 2.6.2 Video Bitrate Calculation
- 2.6.3 Zoom calculations result list

Press on the corresponding button on the Clip & Zoom page to open it.
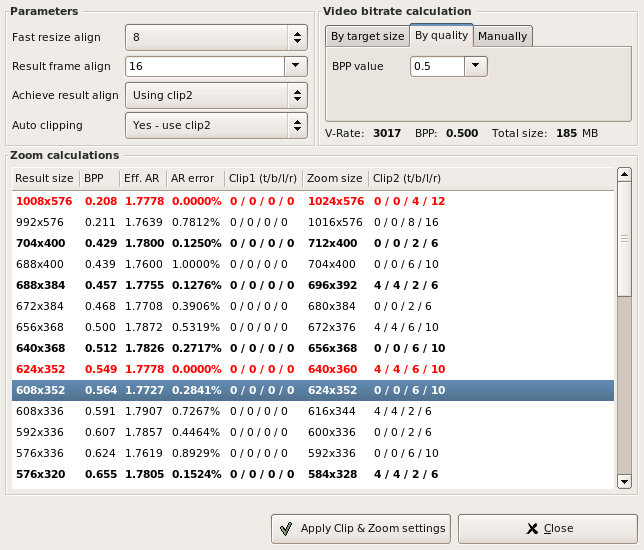
The window is divided into three parts: some parameters regarding the resizing of the image, parameters for specifing the video bitrate and a box, which lists the calculation results of all possible frame sizes.
This way you can understand how dvd::rip calculates frame sizes and you can influence all corresponding parameters by hand.
2.6.1 Resize parameters |
2.6.1.1 Fast Resize Alignment |
You can adjust the fast resize alignment to use (8, 16 or 32), or disable fast resizing by selecting the appropriate popup entry.
2.6.1.2 Result Frame Alignment |
Most video codecs expect a final frame size, which is divisible by 16. You can modify this value, if you want - but first make sure that your favorite codec supports it, otherwise you may get artefacts.
2.6.1.3 Achieve Result Alignment |
There are to ways to achieve the alignment of the result frame. You can use the clip2 stage, but then you will loose some image information, because you crop the borders of the image. Or you get the final size in the zoom stage, but then you may get bigger aspect ratio errors. It's up to you to decide, which is more important for you: full image size or exact aspect ratio. Just play around with the settings to see how they affect the results.
2.6.1.4 Auto Clipping |
You have three choices here: use auto clipping with clip1, or with clip2, or use the manual clipping, you adjusted already with the clip1 entries on the Clip & Zoom page. The difference between clip1 and clip2 is as follows: if you use clip1, the image in the zoom stage is smaller what's slightly faster. But you get very unnatural resize values, which give less aspect ratio accuracy if you use fast resizing. Using clip2 will produce many result entries with 0% aspect ratio error, but the image to scale is bigger, which is slightly slower.
2.6.2 Video Bitrate Calculation |
You can specify the video bitrate, by selecting the target size using the disc size presets, or by entering the target size bitrate or BPP by hand. It's the same scheme, which is used for Video bitrate calculation on the Transcode page. Specifing the video bitrate in this window makes sense, because a special bits per pixel (BPP) value is calculated, which tells something about the transcoding quality.
2.6.3 Zoom calculations result list |
After changing a parameter press the "Refresh" button, and the list of Zoom Calculations will be updated.
The lines are highligthed differently, depending on the aspect ratio error. Red lines mean a perfect aspect ratio. Bold lines denote errors smaller than 0.3%, normal lines mean errors of 0.3% or above.
You can select an arbitrary entry and press "Apply" to copy the corresponding values into the Clip & Zoom page entries. The preview images are recalculated, so you can rate the result immediately. If you press "Ok", the values are also copied, but the window is closed afterwards. "Cancel" closes the window without copying any values.
The result list has the following columns:
2.6.3.1 Result Size |
width x height of the final frame.
2.6.3.2 BPP |
This acronym stands for "bits per pixel". It sets the number of frame pixels in relation to the video bitrate you specified. The bigger the value, the more bits are available to encode a pixel, which means good quality. So if you have small frames, the images can be encoded with high quality. But a small frame means also less image information, so one must find a good balance between frame size and video bitrate. For MPEG4 like codecs, values around 0.25 are good VHS quality, values around 0.4-0.5 result in DVD quality. Just play around with this, to find out what's after your fancy.
2.6.3.3 Effective Ratio |
This is the effective ratio of the frame. It has to be 1.7777 for 16:9 and 1.3333 for 4:3 movies, but it may differ, because resizing isn't always exact, particularly with fast resizing enabled.
2.6.3.4 AR Error |
This is the aspect ratio error, in comparison to the optimal aspect ratio.
2.6.3.5 clip1 (t/b/l/r) |
These are the clip1 values, delimited by slashes: top, bottom, left right.
2.6.3.6 Zoom Size |
This is the zoom size of the frame.
2.6.3.7 clip2 (t/b/l/r) |
These are the clip2 values, delimited by slashes: top, bottom, left right.