
DOCUMENTATION |
http://www.exit1.org/dvdrip/doc/gui-gui_transcode.cipp Printed: Tue Mar 17 16:48:02 2026 CET [ show page without screenshots ] |
2.8. Transcode | [ Content ] [ Top ] |
- 2.8.1 Container options
- 2.8.2 Video options
- 2.8.2.1 Video Codec / ffmpeg/af6 codec
- 2.8.2.2 Keyframe interval
- 2.8.2.3 MPEG variant (for (S)VCD/CVD creation)
- 2.8.2.4 Video framerate
- 2.8.2.5 2-pass encoding
- 2.8.2.6 Reuse log
- 2.8.2.7 Deinterlacing
- 2.8.2.8 Configure filters & preview
- 2.8.3 Audio options
- 2.8.3.1 Select DVD audio track
- 2.8.3.2 MP3
- 2.8.3.3 Vorbis
- 2.8.3.4 AC3
- 2.8.3.5 MP2
- 2.8.3.6 PCM
- 2.8.3.7 Filters
- 2.8.3.8 Sample rate
- 2.8.3.9 Volume rescale / scanning
- 2.8.3.10 Manage multiple audio tracks
- 2.8.4 Video bitrate calculation
- 2.8.5 Calculated storage
- 2.8.6 General options
- 2.8.6.1 Frame range / Test transcoding
- 2.8.6.2 transcode options
- 2.8.6.3 Process nice level
- 2.8.6.4 Preview window
- 2.8.6.5 Use PSU core
- 2.8.6.6 Execute afterwards / exit afterwards
- 2.8.7 Operate
- 2.8.8 Create a WAV file
![]()
2.8.1 Container options |
First you have to decide which target container format you want to have. You have three options here:
- AVI
- OGG
- MPEG
2.8.2 Video options |
2.8.2.1 Video Codec / ffmpeg/af6 codec |
For the AVI and OGG container format you can choose any video codec transcode supports. Some convenient codecs are listed in the combo box, but you can enter the name by hand, in case transcode has a new codec which isn't known by dvd::rip yet.
If you decide to use an avifile codec (setting af6) you can specify the exact codec to use in the ffmpeg/af6 Video Codec field. If you select ffmpeg as a video codec, the field is automatically preset with mpeg4, because that's usually what you want - but can override this setting if you like.
XviD variants
transcode support different versions of the XviD codec. If you don't care about the details, just select xvid, which uses the default XviD codec if your transcode installation, which usually is xvid4 and refers to XviD 1.1.
dvd::rip makes use of the configuration tool xvid4conf, which makes tweaking every aspect of the encoding possible. If you have it installed and choose xvid (or xvid4), the Configure... button becomes active. Hit this button to start xvid4conf for your dvd::rip project.
Note: the xvid4 settings apply to all titles of your project and will not be considered in dvd::rip's Cluster mode. This may change for future dvd::rip and transcode releases.
2.8.2.2 Keyframe interval |
Most modern video codecs know keyframes. Keyframes are fully encoded frames which don't depend on any precedent frame. With this setting you can specify the interval transcode should insert keyframes into the video stream, default is 50 (every two seconds in a PAL movie). The video codec may decide to add more keyframes, e.g. on a scene change. The higher this value, the higher the video compression, but quality may decrease visibly.
2.8.2.3 MPEG variant (for (S)VCD/CVD creation) |
If you selected the MPEG container format, the Video codec entry will renamed to MPEG variant and you can choose between SVCD, VCD, XSVCD, XVCD and CVD. For details about all these variants I recommend reading the site http://www.dvdrhelp.com/.
This is a short table describing how dvd::rip handles the different MPEG variants:
| Option | Description |
| SVCD / VCD |
Both settings create standard conform streams. You can't change specific settings to non-standard values (e.g. bitrates and samplerates). SVCD generates variable bitrate MPEG2 and VCD constant bitrate MPEG1. Also dvd::rip checks the frame size, if it's conform the correspondent standard. |
| XSVCD / XVCD |
The same like SVCD/VCD, but you can set non-standard settings, e.g. different frame sizes, arbitrary video and audio bitrates / samplerates. Be aware that such streams may not play properly on all hardware players. |
| CVD |
CVD is a SVCD variant with specific frame sizes and audio bitrates. Like XSVCD you can change all settings, but there is also a Clip & Zoom preset, which sets the correct frame sizes (for PAL and NTSC) and dvd::rip checks this frame size, when you transcode a CVD. |
Note: you need transcode's mjpeg export filter, which uses mjpeg-tools.
2.8.2.4 Video framerate |
The framerate is determined automatically. For some NTSC DVDs you have to override this guess. Please refer to the transcode documentation for details about NTSC processing.
2.8.2.5 2-pass encoding |
MPEG4 like codecs (Xvid, Divx4/5) support 2-pass encoding. The first run produces a logfile, which is analyzed by the second run to estimate optimal encoding parameters and to achieve an average encoding bitrate, that is close to the supplied video bitrate value. So this increases encoding quality and target size matching, but needs twice as much time as a 1-pass transcoding.
2.8.2.6 Reuse log |
If for some reason the 2nd pass of a 2-pass transcoding went wrong, you can activate this checkbox to skip the 1st pass for further transcodings. The logfile created during the 1st pass will be reused. You should not activate this, if the 1st pass wasn't successfull or you changed video options after the 1st pass, in particular the number of processed frames. Results are unpredictable otherwise.
2.8.2.7 Deinterlacing |
If your DVD is interlaced you should enable Deinterlacing. transcode supports several deinterlace filters:
- Interpolate Scanlines
- is very fast, but has poor quality.
- Handled by encoder
- doesn't actually work with any encoder: transcode will crash (but this may change, so dvd::rip still offers this option ;).
- Zoom to full frame
- will give good quality, but is slow.
- Interpolate scanlines / blend frames (pp=lb)
- moderate quality, faster
- Automatic deinterlacing of single frames
- This special filter is useful for NTSC movies, which have only single frames interlaced. These are detected automatically and deinterlaced where necessary.
- Inverse telecine
- This activates a set of transcode filters which deinterlace NTSC telecined material. You can find more information on this topic in the README.Inverse.Telecine.txt file in trancsode's docs/ directory.
- Smart deinterlacing
- is a port from VirtualDub's smartdeinter filter with a convenient set of default options. You can control all options of smartdeinter using the Filters & Preview window.
Note:
Another option for deinterlacing is to choose a deinterlacer from the
Filter & Preview dialog. All filters mentioned above are also available there, but you can modify all filter specific options and preview their result in realtime.
2.8.2.8 Configure filters & preview |
The Configure filters & preview... button opens a new window, which let you configure all transcode filters with all their options and preview the result in realtime. This dialog is described in its own chapter.
2.8.3 Audio options |
2.8.3.1 Select DVD audio track |
First the Audio options frame is divided into two parts: DVD audio track selection popup and a notebook with the settings for this particular audio track. So you can have multiple audio tracks in the target file.
All settings will follow your DVD audio track selection.
2.8.3.2 MP3 |
You can select or enter an Audio bitrate (128kbit is Ok for most movies) and an encoding Quality. 0 - best but slower is recommended here. You will loose one or two frames per second transcoding speed, but the quality is significantly better as with 9 - low but slower. It's up to you: you can choose out of 10 quality levels. (This corresponds to the quality settings of lame which is used for MP3 encoding).
2.8.3.3 Vorbis |
You must decide between to modes for the Vorbis codec:
- Quality based encoding
- Bitrate based encoding
Usually the quality mode brings better results, in particular because dvd::rip applies some special handling for it: first the audio is encoded with the selected quality level (-1 worst, 10 best). After that, the real audio size is measured and the video bitrate will be adjusted correspondently. This squeezes everything out of the available space ;)
2.8.3.4 AC3 |
There are no further settings for the AC3 codec, because the original DVD AC3 audio track will be passed through without modification. This gives best quality and preserves surround encoding.
Note: AC3 passthrough is currently available only for ripped movies. It's disabled for on-the-fly and DVD image projects.
2.8.3.5 MP2 |
The MP2 codec appears only if you have a video codec VCD or SVCD set. In case of SVCD you can select an Audio bitrate. VCD has a fixed rate of 224 kps.
2.8.3.6 PCM |
The PCM option appears only if the correspondent source audio track is PCM encoded. There are no further settings, because the PCM audio data is passed through without changes.
2.8.3.7 Filters |
For all audio codecs, but AC3 (which is passed through without modification) you can apply a Filter. There are currently three choices:
- None, volume rescale only
- Range compression (liba52 filter)
- Normalizing (mplayer filter)
2.8.3.8 Sample rate |
You can change the sample rate for MP3 and Vorbis codecs. But be careful with odd values here, transcode resp. lame bails out for unusual samplerates - 48000, 44100 and 24000 seem to make no problems.
2.8.3.9 Volume rescale / scanning |
The Volume Rescale entry will show a number, e.g. 2.155 or something like that, if you scanned the volume already (this is done automatically for the audio track you selected before ripping). This is the suggested value for maximizing the volume of the audio channel, which is available in non chapter mode only. Clear this field, if you don't want transcode rescaling the volume. If the field is empty you can scan a proper value by pressing the Scan value button besides.
2.8.3.10 Manage multiple audio tracks |
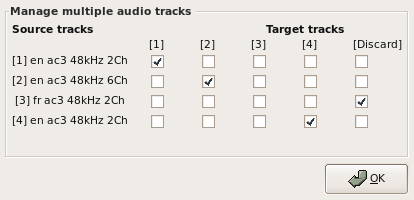
By default dvd::rip activates the audio track you selected for volume scanning on the rip page. If you want to select a different DVD audio track for transcoding or even multiple audio tracks, hit on the Multi... button.
Now you see a matrix of all audio tracks. For each available DVD audio track you have a row with checkbuttons to select the correspondent target audio track, or to disable processing for this DVD audio track completely.
2.8.4 Video bitrate calculation |
dvd::rip supports three methods of video bitrate calculation:
- By target size
- By quality
- Manually
2.8.4.1 By target size |
You can specify the target size by multiples of a disc size. You may enter an arbitrary disc size, or choose one of the listed presets (this refer to common CD-R and DVD-R capacities).
2.8.4.1.1 Consider frame range |
If you want to transcode a specific frame range not only for testing purposes but for the real task, you should enable the Use range checkbox. Then the selected frame range will be used to calculate the video bitrate, not the whole movie.
2.8.4.2 Video bitrate by quality, BPP based |
If filesize is not that important for you but quality you should use the By quality method and enter a BPP (bits per pixel) value. dvd::rip calculates the video bitrate accordingly, even if you change the image resolution afterwards. dvd::rip always shows the resulting file size in the "Calculated storage" section.
2.8.4.3 Video bitrate by hand |
If you don't like to have the Video bitrate calculated automatically at all, just activate the Manual checkbox and enter the bitrate you like to the Video bitrate entry.
2.8.5 Calculated storage |
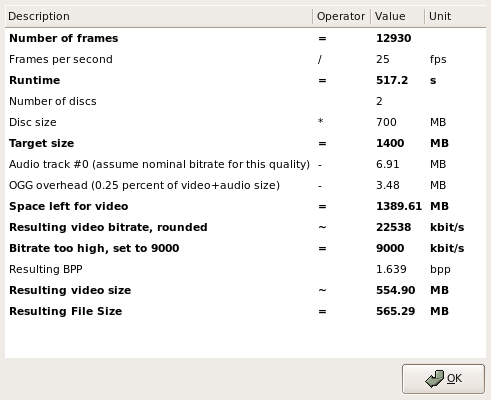
You can press the Show details... button to open a new window, which shows all steps of the video bitrate calculation, so you can see exactly what happens here. The window can stay open all the time. Its calculation sheet follows your settings immediately.
2.8.6 General options |
This frame consists of a few parameters, which affect the transcoding process in general:
2.8.6.1 Frame range / Test transcoding |
You can specify a Frame range by entering a starting and/or end frame number. It's a good idea to transcode about 1000 frames in the middle of the movie to check if your settings are Ok. If you're satisfied with the result, clear both entries (which means transcoding the full movie).
Note: frame range transcoding is rather slow for on-the-fly and DVD image projects, because all prior frames must be decoded. Fast movie navigation is available for ripped movies only.
2.8.6.2 transcode options |
You can add arbitrary transcode options by entering them to the transcode options field. These options are added to the internal transcode call, resp. they override corresponding options already computed by dvd::rip. This is for experts who want to use special transcode features not currently officially supported by dvd::rip (or to fix dvd::rip bugs which are not fixed yet ;).
2.8.6.3 Process nice level |
If you enter a nice level the transcode command will be started using nice -n level, otherwise transcode is started without a special nice level. A value of 19 will run transcode with lowest priority. Providing negative values for increasing the priority is only possible if you start dvd::rip as root, which is not recommended at all.
2.8.6.4 Preview window |
If you activate the Preview window, a window showing the actual encoded frame will appear while transcoding.
2.8.6.5 Use PSU core |
You should keep the Use PSU core radio button enabled, if you have a NTSC movie. This fixes most of transcode's NTSC A/V sync issues. Refer to this section for some details regarding PSU core.
Note: this function is available only for ripped movies. It's disabled for on-the-fly and DVD image projects.
2.8.6.6 Execute afterwards / exit afterwards |
If you want to shut down the computer after transcoding or want to do other things, you can enter a shell command to the Execute afterwards text entry. If you want dvd::rip to exit after transcoding, enable the checkbox and exit.
2.8.7 Operate |
2.8.7.1 Transcode |
In case of a multi CD rip you should activate the Split files on transcoding checkbutton. The movie will be transcoded, using the options you specified, and split afterwards into pieces of the size you specified in the Target media size combo box.
When you start transcoding a .dvdrip-info file will be generated, which contains all interesting technical information about your rip (e.g. bitrates, audio tracks, codecs etc.). This way you later know which settings applied to this specific rip.
2.8.7.2 View |
The movie player you configured for file playback will be started to play the transcoded movie.
2.8.7.3 Add to cluster |
This will add the actual project to a dvd::rip cluster. Refer to the Cluster chapter for details.
2.8.8 Create a WAV file |
If you just want to have a WAV file from your music DVD, e.g. to burn it on a traditional audio CD: select the correspondent audio track and select the Create WAV from selected audio track item in the Operate menu. If the audio track is PCM already, it will be passed through, otherwise a correspondent conversion resp. downmix will be applied.
If your project is in chapter mode, you'll get one WAV file per chapter.