![]()
![]() DOCUMENTATION
DOCUMENTATION
![]() TABLE OF CONTENTS
TABLE OF CONTENTS
![]() INSTALLATION
INSTALLATION
![]() USING THE GUI
USING THE GUI
![]() CLUSTER MODE
CLUSTER MODE
![]() FAQ
FAQ
![]() TRANSLATIONS
TRANSLATIONS
Please note that the cluster mode currently has some restrictions:
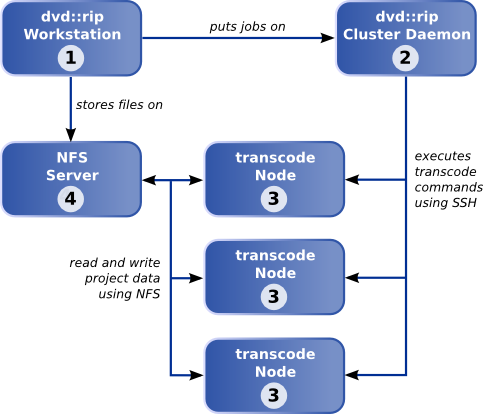
A dvd::rip cluster consists of the following components:
This may be looking confusing, but in fact all the different services described here, can be distributed in arbitrary ways on your hardware. You can even use the cluster mode with one computer, which runs all services: dvd::rip GUI, cluster control daemon, transcode node (naturally using local data access). In this case you "misuse" the cluster mode as a comfortable job controller, which is in fact a regular use case, because dvd::rip has no specific job features besides this. A typical two-node installation may look like this:
Currently this cluster architecture has some serious security issues. Once you setup your cluster it's really easy using it, because there are no password prompts or similar access restrictions. The user key based ssh authentication enables everyone who has access to your cluster control daemon computer logging on the nodes, without having a password at all. This architecture has a small home network in mind, where these drawbacks are not relevant. If you think this is a real problem, you should consider creating special accounts for the dvd::rip cluster access, which are restricted to executing the transcode commands only. Or you should consider, not using the cluster mode of dvd::rip at all ;)
First you have to setup a proper ssh based communication between the cluster control daemon computer and the transcode nodes. There must be no interactive password authentication, because the cluster control daemon must be able to execute the commands without user interaction. Please refer to your ssh documentation for details. This is a brief description of setting up a user key authentication for ssh and OpenSSH. Login as the user who will run the cluster control daemon (on the corresponding computer) and check if this user has a public key: ls -l ~/.ssh/identity.pubIf the file is not present execute this command: ssh-keygenand follow its instructions but press enter if you are asked for a password! Now add the content of your ~/.ssh/identity.pub file to the ~/.ssh/authorized_keys file on each transcode node. After this you should be able to login from the cluster control computer to the node without being prompted for a password. If not, try 'ssh -v' to see, what's going wrong.
The steps documented above work with commercial ssh and OpenSSH as well, but only if the SSH1 protocol is accepted by the server. If you use OpenSSH and your server insists on SSH2, follow these instructions: Generate your key using this command: ssh-keygen -t rsaAgain provide an empty password for your key. Now you should have a file ~/.ssh/rsa.pub. Add the content of this file to the ~/.ssh/authorized_keys and it should work with SSH2 as well.
Another common problem with OpenSSH is, that the transcode binaries can't be found if they're executed via ssh. Often /usr/local/bin isn't listed in the default PATH for ssh connections, but by default transcode installs its binaries there, so they aren't found. The solution for this problem is adding /usr/local/bin to the ssh PATH using the ~/.ssh/environment file. Just put this line into ~/.ssh/environment on the node and all binaries should be found: PATH=/usr/local/bin:/bin:/usr/binor whatever the bin path of your transcode installation is. Don't use any quotes in this line. Note that your sshd.conf must contain PermitUserEnvironment yesotherwise the environment file will be ignored.
Note: All nodes must have access to the project data base directory, usually using NFS. You must export the project data base directory and mount this directory on each node. Later you'll see how to specify the specific mount point for each node. This is an example configuration: on my workstation (called wizard) I have a big hard disk mounted on /mega which holds all my dvd::rip projects, so I exported this: # cat /etc/exports: /mega *(rw)On my notebook I mount this directory to /hosts/wizard/mega by specifing this entry in the /etc/fstab wizard:/mega /hosts/wizard/mega nfsPlease note: don't use the "soft" NFS option in /etc/fstab. This issues a "soft" error instead of retrying in some circumstances and it maybe a real pain to track errors down with this setting.
If you have permissions problems with your NFS setup, because you're using different users on the nodes, you can configure the NFS share to the userid under which the cluster master is running by using a line like this in /etc/exports: /home/cluster/data *(rw,all_squash,anonuid=1001,anongid=1001)Here 1001 is the uid of the cluster master user taken from /etc/passwd. Thanks to Karl Kashofer for this hint.
Now start the cluster control daemon by entering this command: dvdrip-master 2The 2 is the logging level. 2 is Ok for most cases, increase this value if you want more debugging output (which is simply printed to STDERR). You should get an output similar to this: Sun Aug 20 14:22:41 2006 [1] dvd::rip cluster control daemon started Sun Aug 20 14:22:42 2006 [1] Master daemon activated Sun Aug 20 14:22:42 2006 [1] Setting up job plan Sun Aug 20 14:22:42 2006 [1] Started RPC listener on *:28646 Sun Aug 20 14:22:42 2006 [1] Started log listener on *:28647 Sun Aug 20 14:22:42 2006 [1] Enter main loop using Event::RPC::Loop::Event You can ommit starting the daemon by hand, then the dvd::rip GUI will start a daemon for you in background, locally on the machine running the GUI, with logging level 2. In fact you only need to start the cluster control daemon by hand, if you want to pass a higher debugging level or you want to start the daemon on another machine. It's your choice.
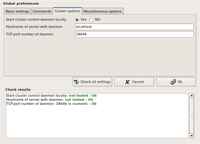
Now, when SSH and NFS communication are set up properly, dvd::rip itself need some configuration for the cluster mode.
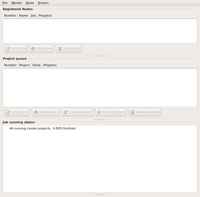
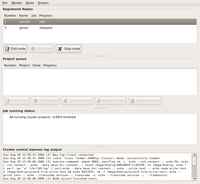
The window is divided into four parts: the node list, project queue, job queue and a log area, with logging messages from the cluster control daemon. The lists are empty, because we neither configured cluster nodes nor pushed projects on the cluster. You can change the height of all lists to fit your needs. If you don't care about the log messages you can even reduce it's size to zero completely and hide it this way.
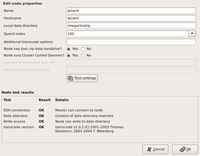
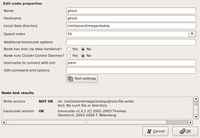
Now it's time to add nodes to the cluster. Choose the Add Node item from the Node menu and the Edit Cluster Node window will be opened. Basically one can divide nodes into two classes: a local and some remote nodes. The local node runs the cluster control daemon, so there is no SSH communication necessary to execute commands on it. Usually this node has also the harddisk connected, so no NFS is needed to access the data. For remote nodes the cluster control daemon uses SSH to execute the commands, and they usually access the data through NFS or something similar. dvd::rip passes I/O intensive jobs to the node with local disk access, because network access may slow down such jobs significantly.
If you have multi processor machines, another option is to configure multiple nodes for them by providing different node names with the same hostname. For most other cases you can leave the hostname entry empty, if the node name is already a valid hostname. Additionally you can set a Speed index for each node. The higher this value, the faster is this machine. dvd::rip prefers node with a high speed index for CPU intensive tasks.
You can press the Test button at any time to check whether your configuration is correct or not. The Node test results area will list the result of the tests, including detailed error messages if something went wrong, so you have some hints what's needed to fix an issue. This way you easily can detect a wrong NFS mount point configuration, SSH problems or different transcode versions on the local machine and the node.
Ok, now we have a proper cluster setup, what is missing is a project the cluster is working on.
First, rip and configure your project as usual. Exactly when you usually press the Transcode Button you press Add To Cluster instead. The cluster control window will be opened, if it's not already open. Also the Cluster Project Edit window will appear, where you can adjust some properties.
Then you can select, if temporary files should be removed when they're not needed anymore. You should enable that, because in cluster mode the project needs up to 3 times more space than a normal project. Also the VOB files can be removed after transcoding, if diskspace is a problem.
Your project (with the currently selected title) was added to the project queue. The initial state of the project is not scheduled. You can push as many projects as you want to the cluster this way, and set the priority by moving the project up and down in the queue (using the appropriate buttons). Now simply press Start project for each project you want the cluster to work on. The state of the 1st project will switch to running. Also the state of all idle nodes will switch to running and as much jobs as possible will be executed in parallel.
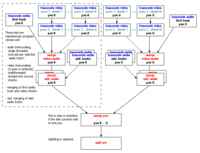
As many nodes as possible will be used in parallel for this phase. They will transcode different chunks of the video from MPEG to AVI, but without audio.
Due to technical reasons audio has to be transcoded independent from the video and it's not possible to break up the job into chunks which can be processed in parallel. If you selected more than one audio track, an appropriate number of audio transcoding jobs will appear.
The transcoded audio file of the first selected audio track and all video chunks are merged and multiplexed into one file. This is done preferably on the node with local harddisk access.
Additional audio tracks are merged to the result of Merge video + audio.
If the movie consists of more than one program stream unit, the steps above are repeated for each unit. The corresponding files are then merged together.
If you decided to split the AVI afterwards, this is the final phase.
As noted above, the cluster control daemon regularly checks the status of the transcode nodes. If a node goes offline the corresponding job will be cancelled automatically and later be picked up by another idle node. You can stop and start nodes by hand, using the corresponding buttons. The job the node is working on will be cancelled. A stopped node doesn't get jobs, even when the node is online. This way you can take a node out of the cluster dynamically, when you want to use it for other things. You can remove a project only if it's not active resp. it's finished. You must first stop all nodes working on the project, then you can remove it.
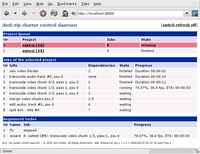
By default the cluster control daemon doesn't start the webserver service. To fire the webserver up you need to start the dvdrip-master program by hand, using the -w and -W options: dvdrip-master -w -W 8888-w enables the webserver service (no extra process is started - the webserver is an internal component of dvdrip-master). -W is optional and sets the TCP port on which the webserver should listen to. The default port number is 8888. The delivered page is rather simple. It's much like dvd::rip's GUI, except for the possibility of modifying the cluster's state. You can select a project from the project queue to view its jobs. You can switch on (and off) auto-refreshing using the corresponding link on the top right of the page. The reload interval is 5 seconds.
The dvd::rip cluster control daemon stores its state independently from your dvd::rip GUI workstation. That means, once you've added a project to the cluster, changes to the project done with dvd::rip will not affect the cluster operation. The cluster control daemon stores its data in the ~/.dvdrip-master directory of the user, who executes the cluster control daemon. The node configuration and all projects are stored here. The manipulation of these data is done via the Cluster Control window of dvd::rip. The dvd::rip workstation does not store locally any information of the cluster. The communication between the dvd::rip GUI and the daemon is done using a TCP based protocol, which enables dvd::rip creating objects and calling their methods transparently over the network. Additionally the cluster control daemon listens to the port number 28656 and echos all log messages to connected clients. So you simply can telnet to the daemon on this port, to see what's going on (besides opening the dvd::rip Cluster Control window, which exactly does the same ;) |
